Slitting Line Problems & Solutions
Diagnose and fix common slitting problems with this expert troubleshooting guide. From width variation to edge quality issues, find the root cause and solution.
On this page6 sections
Six defects account for most of what comes off a slitting line wrong. Each has a characteristic look, a short list of likely causes, and a fix that usually works. What follows is the reference version: what you are looking at, why it happened, and what to change.
What causes burr on slit edges and how do you fix it?
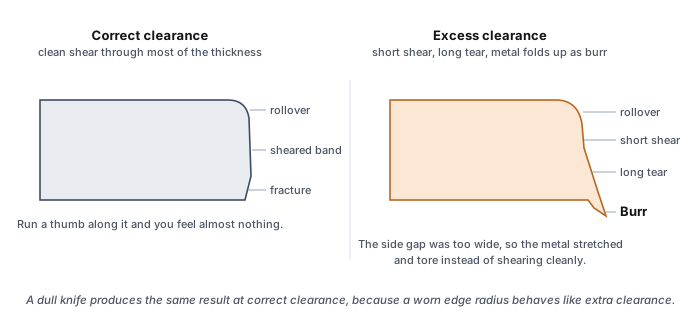
A burr is a raised lip of metal along the cut edge, on the underside of the strip where the fracture broke out rather than sheared. Run a gloved thumb along the edge and you will feel it before you see it.
Cause. Excess horizontal clearance is the usual reason. When the side gap between upper and lower knife is too wide, the metal stretches and tears across the last part of the thickness instead of shearing cleanly, and the torn material folds up as a burr. Dull knives produce the same result at correct clearance, because a worn edge radius behaves like extra clearance. Insufficient knife overlap contributes on heavier gauge.
Fix. Reduce horizontal clearance a step at a time, toward 8 to 10% of gauge for carbon steel, and recut. If reducing clearance does not help, the knives are the problem: inspect the edges and send them for regrind. Burr height that climbs steadily during a run is wear, not setup, and tells you the regrind threshold was set too high.
What causes camber in slit strips and how do you fix it?
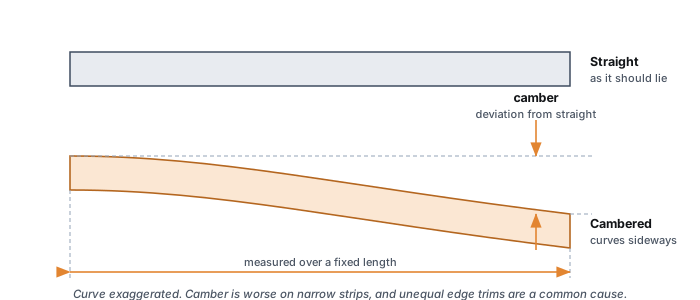
Camber is a sideways curve. Lay a strip flat and it bows left or right rather than running straight, and it is worse on narrow strips than wide ones.
Cause. Camber is usually residual stress in the parent coil releasing unevenly once the material is cut into narrower widths. Unequal edge trims make it worse, because the two sides of the coil release different amounts of stress. Uneven knife clearance across the head and excessive side guide pressure both add to it.
Fix. Balance the edge trims as closely as the job allows, so both sides release comparably. Reduce side guide pressure. Check that clearance is consistent across every boundary rather than correct on average. If a particular coil supplier produces camber repeatedly on material that is otherwise fine, the stress came in with the coil and needs addressing upstream through levelling or stress relief.
What causes edge wave and how do you fix it?
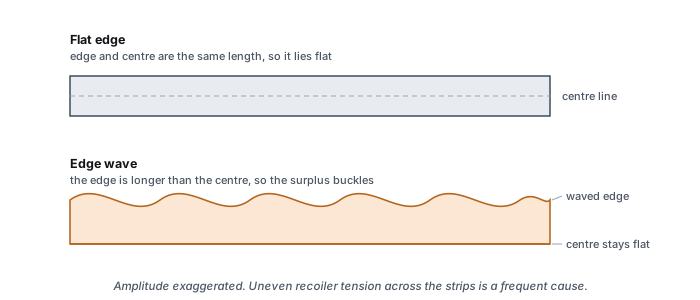
Edge wave is a rippled, fluttering strip edge. The edge is longer than the centre of the strip, so the surplus length has nowhere to go and buckles into waves.
Cause. The edge has been stretched more than the centre. Excess knife overlap is a common source, as is uneven tension across the width at the recoiler. Incoming material that already has a length differential across its width will show it as wave the moment it is slit, even with a perfect setup.
Fix. Reduce knife overlap to the minimum that still gives a clean fracture. Check recoiler tension and separator disc arrangement so no lane is pulled harder than its neighbours. If wave appears on every strip across the width, look upstream at coil flatness rather than at the slitter head.
What causes crossbow and how do you fix it?
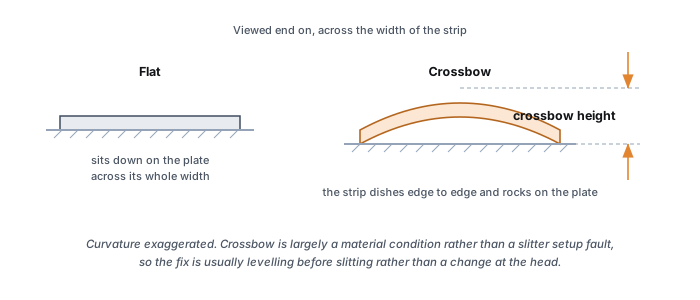
Crossbow is a curl across the width. The strip dishes from edge to edge instead of lying flat, and it shows up most obviously when material is cut to length or stacked.
Cause. Coil set carried in from the parent coil is the main source, particularly on strips taken from near the coil bore where the winding radius was tightest. Uneven tension and recoiler geometry can add to it.
Fix. Crossbow is largely a material condition rather than a slitter setup fault, so the fix is usually levelling before slitting, or adjusting recoiler tension. If it appears only on strips from particular positions across the coil, the pattern points at the parent coil rather than your tooling.
What causes slit width variation and how do you fix it?
Strips measure outside tolerance, or different strips from the same setup measure differently from each other.
Cause. Start with the arithmetic. The most common single cause is a knife thickness that is wrong in the calculation, usually because a nominal value was used for a knife that has been reground several times. Because each pocket is built to the strip width minus one knife thickness, that error repeats at every boundary. After that: compressed rubber spacers carrying a dimension they should not be carrying, arbor deflection under load, and worn shafts with runout.
Fix. Measure the knives you are about to fit and calculate from the measured thickness, not the catalogue value. Keep matched sets together rather than substituting a close-enough knife. Move the critical dimension onto metal spacers and let rubber control the strip. Check arbor runout on schedule. The slitter knife software guide covers keeping those measurements trustworthy over time.
What causes knife marks on the strip and how do you fix it?
Knife marks are scores, lines, or bright rubbed bands running along the strip surface parallel to the edge, distinct from anything happening at the cut itself.
Cause. Something is touching the strip face that should not be, or something that should touch it is doing so too hard. Worn or wrongly sized ejector rings let the strip climb and rub against the knife face. Debris or pickup welded onto a knife side drags a line down the strip for the length of the coil. Damaged separator discs mark the surface at the recoiler.
Fix. Stop and inspect the knife faces for pickup and clean them. Check ejector ring condition and sizing against current knife diameter, remembering that regrinds shrink the knife and change that relationship. Check separator discs for flatness and burrs. Marks that appear at a consistent position across the width will point you at the specific part causing them.
Quick Reference: Knife Clearance Guide
Prevent Setup Problems Before They Happen
Most slitting problems trace back to setup errors. OptiStack Pro eliminates calculation mistakes, generates exact specifications, and helps you achieve first-time-right changeovers consistently.
- Eliminates calculation errors, the #1 cause of width problems
- Generates printable assembly sheets for operators
- Calculates proper clearance for each material type
- Tracks performance data to identify recurring issues
Common Problem Sources Addressed
Calculation errors
Completely eliminated
Setup trial-and-error
First-time-right
Wrong clearance
Auto-calculated
Documentation gaps
Printable sheets
Troubleshooting FAQ
Download this troubleshooting guide as PDF
Keep it on the shop floor and we will email you a printable PDF of every problem & fix in this guide.